Return to the main page
The installation of PHP is bit odd since instead of using a single installation package you need the ZIP package and the installer package, since the installer doesn't contain the full PHP package (but it's useful for creating a working php.ini file easily). Also, the part of the PHP installer for configuring Apache hasn't been finished yet for versions 4.x, so we'll need to add some lines to httpd.conf.
First, unpack the contents of the ZIP file to the folder in which you want to install PHP. Note that the ZIP package already contains a folder named "php-4.4.x-Win32", so if you unpack the file in "C:\Program Files\PHP\" the PHP files will be stored in "C:\Program Files\PHP\php-4.4.x-Win32\". Don't use the option of not extracting folders/pathnames or PHP won't work.
Then run the installer and select the Standard installation. In the next panel select the folder in which you unpacked the PHP package (the folder that contains the php.exe file). Left unchanged the panel about SMTP configuration (SMTP won't run on Windows unless you install an SMTP server) and in the next panel select Apache from the list of servers. Finally, press Next to start the installation. If all goes fine, the installer will create a php.ini file in the Windows folder with the PHP configuration, and some directories in the PHP folder.
Before enabling the Apache module for PHP, you need to copy the file php4ts.dll located in the PHP installation folder to the System folder (usually "C:\Windows\System" for Windows 98/Me, "C:\Winnt\System32" for Win2000 and "C:\Windows\System32" for WinXP).
Then you need to enable PHP in the Apache server. Supposing that you installed PHP in "C:\Program files\PHP", you need add the following lines at the end of the modules section of httpd.conf:
LoadModule php4_module "c:/Program files/PHP/sapi/php4apache2.dll"
AddType application/x-httpd-php .php
Finally, locate the DirectoryIndex option and add "index.php" at the end of that line. The resulting line should be:
DirectoryIndex index.html index.html.var index.php
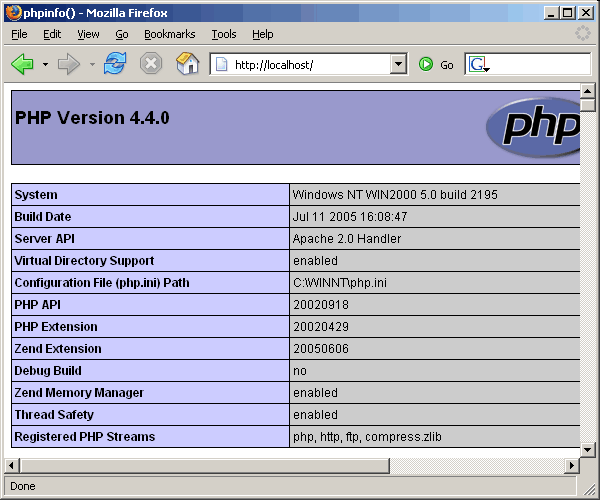
After restarting the Apache server, you should note that the index of the server root now shows "Apache/2.0.xx (Win32) PHP/4.4.x" at the bottom of the page. If you want to test the new configuration, create a file named "index.php" in the server root folder and put inside the following line:
<?php phpinfo(); ?>
After saving the file, if you open "http://localhost/" in your browser you should get something like this:

As well as Apache, PHP use extensions to extend its capabilities. By default, all of the extensions of PHP are disabled. If you need to activate a extension, look for the extensions section of the php.ini file (it begins with Windows Extensions). Then locate the line with the module you want to activate and remove the comment (the ";" character) present at the beginning of the line.
Some of the extensions require additional DLL's to work. That DLL'S are located in the "dlls" subfolder inside of the PHP folder and must be copied your System folder prior to activating that extensions. In the table below you can see a list of the most common extensions that need additional DLL's:
| Extension | Requires |
|---|---|
| php_curl.dll | libeay32.dll, ssleay32.dll |
| php_domxml.dll | iconv.dll |
| php_iconv.dll | iconv.dll |
| php_ldap.dll | libeay32.dll, ssleay32.dll |
| php_msql.dll | msql.dll |
| php_mssql.dll | ntwdblib.dll |
| php_openssl.dll | libeay32.dll |
| php_xslt.dll | sablot.dll, expat.dll, iconv.dll |
For example, if you want to activate the extensions "php_domxml.dll" (for DOM XML functions) and "php_gd2.dll" (for image functions), you need to uncomment the following lines:
extension=php_domxml.dll
extension=php_gd2.dll
And since "php_domxml.dll" requires "iconv.dll", you need to copy that file to your System folder.
If after setting up your local server you fing that some of your code doesn't work on it, is highly probable that you are still relying in the deprecated register_globals option of the php.ini file. This option has been disabled by default in PHP for more than three years due to security issues, and consequently very few hosting providers enable it nowadays. Anyway, a few administrators still enable it in order to support legacy code (which is an invitation to having your site hacked if the hosted PHP code doesn't make the proper security checks).
The typical example of code that rely on register_globals is when you use the data posted by a form in this way:
First file: source.php<form action="destination.php" method="post">
Enter your text here: <input type="Text" name="some_text">
<input type="submit">
</form>
<?php echo $some_text ?> // bad! relying on register_globals! The right way of using the form variables in destination.php in PHP is through the server superglobals:
<?php echo $_POST['some_text'] ?> or if you use GET instead of POST:
<?php echo $_GET['some_text'] ?> In the same way, if you need to get the document root you have to use
$_SERVER['DOCUMENT_ROOT'] instead of $DOCUMENT_ROOT. For more
information, take a look to the following pages of the PHP manual:
Superglobals variables:
http://www.php.net/variables.predefined
Security issues of Register Globals:
http://www.php.net/register_globals
Page: 1 2 3 4 5 Next: Setting up MySQL
Return to the main page